Stack3d Guide
I would highly recommend not using Stack3D for any projects. I think it has some fundamental issues. If you are looking to do 3d stuff in gamemaker, settle for basic sprite stacking, or actually use the 3d rendering properly. You can also switch to a 3d engine instead, which will have much better performance.
Read Anyway
Guide for the fastest method of Sprite Stacking in Gamemaker.
What is this?
Stack3D is a small library for Gamemaker Studio 2 that lets you make Sprite-Stacking style games using actual 3d functionality. The advantages of this are:
- Massively increased performance.
- Multi-axis rotation of camera and objects.
- Proper z-axis.
- Better depth sorting.
- Easy import from MagicaVoxel.
Where can I download?
You can download Stack3D on Itch.io or Github. Github will likely be more up to date at any given time, but I promise to update itch.io for major changes.
How do I use it?
Necessary setup
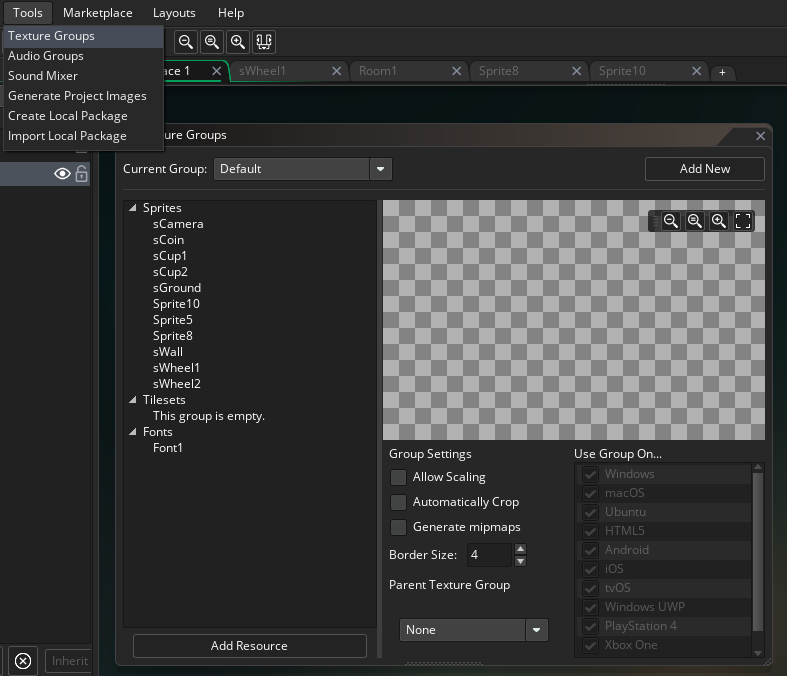
To use Stack3D, there is some initial setup required in your project file. The first thing is that you will need to disable automatic cropping of texture pages.
Click Tools > Texture Groups and then deactivate “Automatically Crop”.
If you’re going to have large models in your game, it will be a good idea to increase the size of your texture pages. If you’re building for Windows, click Game Options > Windows > Graphics, and then go down to Texture Page Size and select either the largest or second largest option.

Next, you will need to copy over/import the following resources:
- sprite_stack_vertex_toolkit
- shdStack
- oCamera
- pDepth
- p3D
If you want to use some of the shader effects from the demo, you should copy over the other shaders too.
Finally, you will need some sort of system to handle loading/unloading the 3d models in each room, and also drawing the models. An example of this is given in o3Dtest, however it also contains unnecessary code that was used to setup the demo. So I recommend making a new object called oModelManager, and copying over the following events from o3Dtest:
- Create Event
- Draw Event
- Destroy Event
For a larger game, it might be a good idea to have a separate object draw the 3d models. Just make sure that you are using some sort of alpha-testing when drawing the stacked sprite models, since some of their pixels need to be discarded in order for the depth sorting to work properly. In the example project, this is done by shdStack, which discards pixels below a certain alpha threshold.
Tweakable values
The following things can be tweaked in oCamera to change the appearance of the project:
Create Event:
- z_distance: affects the clipping planes of the camera.
- camera_speed: speed at which the camera moves. highly recommend coding your own camera movement
- default_camera_width and default_camera_height: equivalent to the view width and height from the normal camera system
- incline_angle_minimum and incline_angle_maximum: the maximum angle that the camera’s z-axis can be tilted
- gpu_set_texfilter(true): leads to a pseudo-shaded effect on the stacked models.
You can also change the type of billboarding that billboarded objects use. The default is Cylindrical billboarding, where the model always faces the camera in the X, Y plane, but will appear thinner if the camera is above. Uncommenting Draw Begin line 36 changes to Spherical billboarding, where billboards always fully face the camera.
The last thing you can tweak easily is the stacking_fidelity, which is how many layers are used for each “slice” of the stacked sprite models. This is probably the most important setting in the game. Low values have better performance, but you will see holes in between the layers of the models when rotating them or the camera too much. Values of 4, 8, or 16 seem to work best for me.
Adding objects
Every object that you want to be drawn in the game should inherit from pDepth. 3d objects should inherit from p3D. In the create event of each 3d model, you will need some custom code to load the 3d model, using load_stack_sprite(). For sprite stacked models, you will only need to change the layer_count, which is equivalent to thee z-height in MagicaVoxel. Make sure that objects inherit their parents event.
If you need to change the way objects are drawn, you can change the default draw events from pDepth and p3D. By default, draw_stack_self() and draw_billboard_self() are used to draw objects, but there are also draw_stack_ext() and draw_billboard_ext(), which allow you to tweak the position, rotation, scale, and color of objects.
If you’re trying to replicate the normal draw functions from 2d games, use draw_normal_self() and draw_normal_ext() to replicated draw_self() and draw_sprite_ext() respectively.
Importing from MagicaVoxel
To import new 3D models from MagicaVoxel, all you need to do is type “o slice” in the console, to export your model as a png.
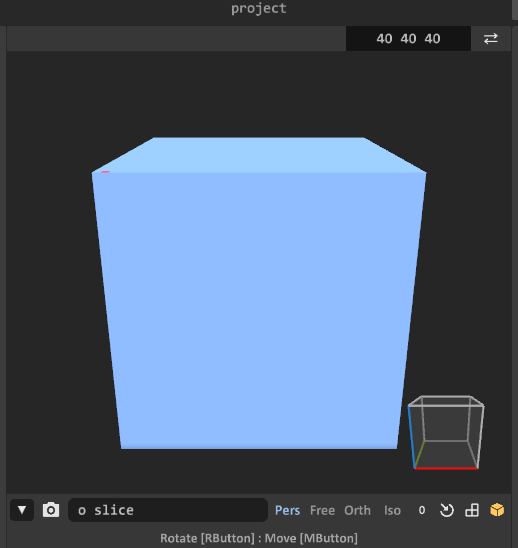
Then simply drag the png into your gamemaker project. You don’t need to set the origin, or import as strip image.
Tips / You should know**
Mouse Coordinates
The mouse_x and mouse_y variables will no longer work due to the 3d projection. Instead use get_projected_mouse_x() and get_projected_mouse_y().
Wall objects
Walls can be one of the more performance-intensive things to sprite stack. If all you need is a cube, use the function create_3d_wall() instead of load_stack_sprite(). This can be used to create a 3d model of a cube with textured top, sides, and bottom. You can then draw this model as usual with the draw_stack_ functions.
Seperate texture groups
If you are making a large RPG style game like I am, you will likely end up with many assets. It will improve performance significantly, and fix many texture-bleeding issues, if you split textures into Texture Groups. Ideally, you should put all the sprites needed for a given room/area in a single group; this is not always possible, since you can only assign a sprite to one texture group, and some sprites will need to be reused in multiple places.
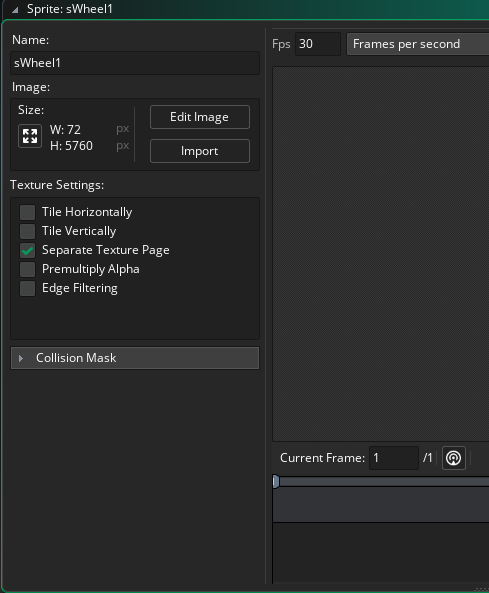
Seperate texture page for large models
Large models (above 100x100x100) will likely need their own texture page, to prevent them bleeding over onto other sprites. You can set this up by clicking on the sprite resource, and Activating “Seperate Texture Page”.
How does it work?
Vertex buffers
The naive sprite stacking technique creates the illusion of 3D by drawing 2d images offset from each other by 1 vertically. When the images are rotated, the images appear to make up a 3d model. This system replicates this functionality closely, but instead of repeatedly drawing all the layers individually, it creates a 3d model that is itself a series of stacked up 2d planes. This way, duplicate objects do not need to waste as much processing drawing themselves, and rotations can be performed more efficiently.
The vertex buffers are created from the 2d image by load_stack_sprite(). This function takes in the layer_count of the model, and then creates that many 2d rectangles stacked on top each other. It then splits the texture up into the right amount of slices, and applies it to each layer of the texture. This is very different from normal 3d models, where 2d triangles are used to sculpt a 3d shape.
After creating the vertex buffer once per sprite, it can be drawn to fit the objects by changing the world matrix which is the main matrix that affects objects in the world. The world matrix is used to move the model to the right x,y,z coords, rotate it, and scale it.
3D Cameras
All the vertex buffers would be for nothing if they could not be rendered in 3D! To render in 3D, it is necessary to forgo Gamemaker’s camera system, and access the system at a lower level using matrices. I had to figure out how to replicated the perspective of sprite stacking models using an actual 3d projection. What I developed is this:
- Position the camera directly away from the origin by z_distance, tilted on the Y, Z axis by incline_angle.
- Rotate the view matrix based on camera_angle, to get the right view_angle of the world.
- Translate the view matrix to the camera’s x, y, z position.
All of these steps were implemented using the matrix_functions in the oCamera Draw Begin Event.
Finally, to actually render things in Gamemaker, you have to set the projection matrix as well. The projection matrix tells Gamemaker how to translate the 3d objects from the view and world matrices onto the screen. I used an Orthographic projection, to replicate normal sprite stacking as closely as possible.
Once the 3D camera is set up, adding depth sorting is as easy as putting the following two lines in oCamera’s Create Event: gpu_set_ztestenable(true); gpu_set_zwriteenable(true);
Shaders
The final step in the draw pipeline is the shaders that actually draw the 3d models. Not much was changed from the default shader, except a couple lines that discard pixels if their alpha is too low. Discarding these pixels prevents them from being written to the depth buffer. If they aren’t discarded, the transparent pixels can end up obscuring the layers beneath them, making parts of the 3d models dissapear.
Who made this?
Stack3D was made by me, dev_dwarf. However, it would not have been possible without help from members of the Gamemaker Discord Server, especially Cecil and Zik. Gizmo199 also helped with optimization and organization.
Sprite Stacking in Gamemaker was first documented by Deadly Yucca. The technique was largely popularized through Moppin’s game NIUM.
So if you get benefit from this system, please follow everyone mentioned above :). I’ll be using this system to develop my game Nialthus:
Enter NIALTHUS#screenshotsaturday #gamedev pic.twitter.com/3wb40Z86Z8
— lonar fongam 🌳🌻💀🌻🌳 (@dev_dwarf) January 16, 2021</blockquote>
FAQ:
empty for now.
</details>
</div>